Raspberry Pi Setup
Install Raspberry Pi OS
Insert the microSD card into your card reader and start the Raspberry Pi Imager.
Start with selecting Raspberry Pi Zero 2 W as your device.
Continue with the OS selection where you need to go to Raspberry Pi OS (other) first. Then, choose Raspberry Pi OS Lite (64-bit) (based on Debian Trixie with Python 3.13).

Select your SD card as storage medium and continue to the Customisation settings.
- Set your Hostname that will be used as device ID. Make sure to give each device
a unique hostname, e.g.
insdet-cam01,insdet-cam02, etc. Note the hostname, as you will need it to connect to the RPi via SSH later. - Check if the Localisation settings are already correct and modify them if needed.
-
Continue to User and keep the default
pias username. Changing the username will break the software functionality, do this on your own risk. Choose a simple password, you won't actually need it, as we will set up SSH key based authentication in the next steps.
-
Add your Wi-Fi credentials so that the Raspberry Pi can connect to the internet for the initial software download and installation. This can be e.g. a 2.4 GHz mobile hotspot.
-
Continue to the Remote access settings and enable SSH with public key authentication. If there is no SSH key configured yet, hit the
BROWSEbutton and select theid_rsa.pubfile in the.sshfolder in your user directory. Add multiple public SSH keys if you need to be able to connect to different computers.
-
Optionally, activate Raspberry Pi Connect. This is only recommended if your Raspberry Pi is always connected to a Wi-Fi network and you need to be able to remotely access it.
Write the customized Raspberry Pi OS to your microSD card and insert it into the Raspberry Pi after it is finished.
Turn On Raspberry Pi
If you are not using a power management board, insert a Micro-USB cable connected to a power supply, battery or laptop into the PWR IN Micro-USB input of the Raspberry Pi, which will trigger it to turn on. The first boot can take a little bit longer (up to 5 min).
Witty Pi 4 L3V7
If you integrated the LED button, press it once to turn on the Raspberry Pi. If you don't have an external button, press the button on the Witty Pi board to turn on the Raspberry Pi.
Green LED: battery fully charged indicator
Blue LED: battery charging indicator
Red LED: power indicator
On/Off Button

If the red LED on the Witty Pi board is turned on, the Raspberry Pi is powered via the GPIO pins by either the USB-C input (if 5V battery pack is connected and charged) or the 3.7V battery pack (5V battery pack not connected or empty).
After installing and configuring the Witty Pi software, the power to the Raspberry Pi will be cut 25 seconds after a shutdown command is received and the red LED will turn off.
More info: Witty Pi 4 L3V7 User Manual
Red LED stays on
If the Raspberry Pi is turned off, but the red LED on the Witty Pi board still stays on after 25 seconds, the button will not be responsive as the Witty Pi assumes that the RPi is still turned on. This can happen if the Witty Pi software is not yet installed or if there is a problem with the GPIO connection (check for faulty solder joints). To make the Witty Pi responsive again, press and hold the button for 10 seconds until the red LED turns off.
PiJuice Zero
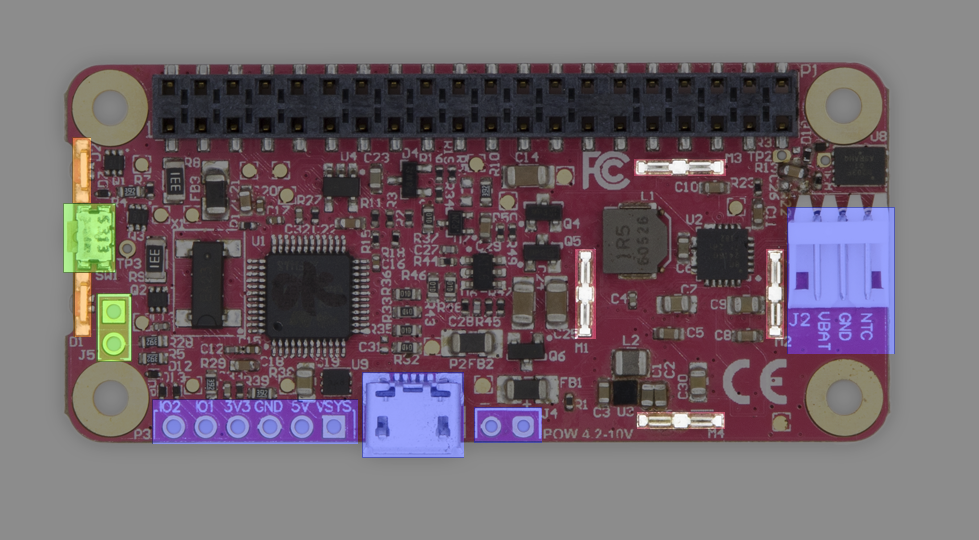
Turn on the Raspberry Pi with a short single press on the PiJuice SW1 button (marked green on the left side of the following picture).
More info: PiJuice Buttons and LEDs
Connect RPi via SSH
You can connect to the RPi via SSH by using the hostname that you set during the RPi OS installation. If this does not work, you will have to use its IP address instead. There are several ways to find the RPi's IP address, one of the easiest solutions is to install the Fing App and scan the IP addresses of all devices in your Wi-Fi network.
Open a new Terminal in VS Code. Use right-click to paste commands to the Terminal.

Connect to your Raspberry Pi via SSH by running:
pi = username. insdet-cam01 = hostname. Change it to
the hostname that you set during the RPi OS installation.
When you are asked if you want to continue connecting, type yes and hit Enter.
Add RPi File Explorer
We will use the SSH FS extension that you installed in Local Setup to mount a remote workspace folder (from Raspberry Pi) as a local workspace folder in VS Code. This makes working with files on the Raspberry Pi easier (e.g. editing Python scripts or showing metadata/logs/images).
-
Open the SSH FS extension and create a new configuration (
Name: your RPi hostname). HitSaveto start editing the configuration.
-
Configure the following fields and keep the rest empty:
Host: your RPi hostnamePort:22(should be the default)Root:~/(will open the/home/pidirectory)Username:pi-
Private key: hitPromptand select the path to your SSH key (id_rsa)
-
Hit
Saveat the bottom to save the configuration. -
Hit
Add as Workspace folderto the right of your saved configuration to mount the/home/pidirectory from the Raspberry Pi in your local workspace.
-
Hit the blue SSH FS icon in the bottom left corner and select
Close Remote Workspaceto close the workspace and disconnect from the Raspberry Pi (e.g. after shutdown).
Update RPi
We will start with updating the already installed software by running:
When you are asked if you want to continue, confirm with Y+Enter.
Reboot the Raspberry Pi after all updates were successfully installed with:
After the reboot you will have to establish a new SSH connection.
Configure Power Manager
The insect-detect
software supports both the Witty Pi 4 L3V7
and PiJuice Zero
as power management boards. With the new 2024 version of the hardware setup,
the Witty Pi is used by default but can be easily exchanged with the PiJuice.
Configure Witty Pi 4 L3V7
-
Install the Witty-Pi-4 software from the modified fork:
-
Reboot the Raspberry Pi after the software was successfully installed:
-
Start the Witty Pi 4 configuration tool by running:
-
Type 3 in and hit Enter to synchronize the RTC time with your network time:

No internet connection
If you are connected to the RPi hotspot and therefore are not able to get the network time due to the missing internet connection, first set the RPi system time to the current date + time manually by running:
Then use the first option
1. Write system time to RTCin the Witty Pi configuration tool to synchronize the RTC time with the system time.Batteries Unplugged
If you unplug both the 3.7V battery and USB-C input (5V battery) from the Witty Pi board, the RTC will not be powered and lose its time. In this case, you will have to synchronize the RTC time with your network time again.
-
Next, we will deactivate Auto-On when USB-C is connected to the Witty Pi. Type 8 in the Terminal and hit Enter. Select
Noby typing 0 and hit Enter again:
-
Type
11and hit Enter to go to11. View/change other settings... -
Type
2and hit Enter to change the power cut delay time after shutdown. Type in25which is the maximum allowed value and hit Enter:
-
Back in the main menu, type
13and hit Enter to exit the Witty Pi configuration.
Now that the Witty Pi 4 L3V7 is configured, we can set up scheduling of automatic
startup and shutdown times. This is done with .wpi schedule files containing a
custom ON/OFF sequence. In the
wittypi/schedules
directory you can find some example schedule scripts.
Start with creating a BEGIN and END date + time that will define the duration
of your loop, which will continue as long as the current time is between the
BEGIN and END time of the schedule script. Add your first ON state and how
long it should last. Use D to set the number of days, H for hours, M for
minutes and S for seconds.
Add WAIT after the duration of an ON state to trigger the shutdown externally
(e.g. shutdown command at end of Python script). In this case, the end of the
ON state will not automatically trigger a shutdown but is required to calculate
the duration of the next OFF state.
To activate your schedule script, run the Witty Pi 4 configuration tool:
Type 6 and hit Enter to Choose schedule script. We are selecting the
example script
that will turn on the Raspberry Pi every day at 9, 12, 15 and 18 o'clock.

After choosing the schedule script, it will be copied to wittypi/schedule.wpi
and the wittypi/schedule.log file will start logging startup/shutdown events.
You can also use the Witty Pi Schedule Script Generator to create your schedule script with a visual feedback and the option to run a preview of the scheduling behaviour. You can find more information in chapter 9 of the Witty Pi 4 L3V7 User Manual: About Schedule Script.
Configure PiJuice Zero
Install the PiJuice software by running:
When you are asked if you want to continue, confirm with Y+Enter.
After the installation you can check if the PiJuice Zero is correctly detected by running:
If you see an entry at address 14 and 68, the connection to the PiJuice is
now established.

From now on we want to use the built-in RTC
of the PiJuice Zero board as primary hardware clock to wake up the Raspberry Pi
at specific times when it is not connected to the internet. For this, we will
have to manually load the RTC driver at each boot by modifying the
config.txt file:
Add the following lines at the end of the text file:
Exit the editor with Ctrl+X and save the changes with Y+Enter.

Reboot the Raspberry Pi:
After the reboot run:
You should now see UU at address 68, which means that the RTC driver was
successfully loaded and the PiJuice RTC will now be used as hardware clock.

You can check if the date and time is correct with:
We will now configure the PiJuice Zero through its command line interface by running:

- Start with checking if the firmware is up to date by going to the
Firmwaretab (use the arrow keys to navigate). If there is a new version available,Updatethe firmware. - Next, go to the
Battery profiletab and check if the correct profile is selected. If you are using the 12,000 mAh battery, this should bePJLIPO_12000. Scroll down and changeTemperature sensetoNTC. This will make sure that the battery temperature is correctly estimated. Save the changed settings withApply settings. -
Go to the
System Tasktab, activateSoftware Halt Power Offand set theDelay period [seconds]to20. With this setting activated, the power to the Raspberry Pi will be cut off 20 seconds after a software shutdown has occured. This will make sure that the OS can complete the shutdown process without potential SD card corruption.
-
Optional: Depending on your hardware setup, under the
Battery profiletab you could decrease theTermination current [mA]to e.g.100if you are using a solar panel as direct input into the PiJuice Zero (Minimal Setup without Voltaic battery).
The most important settings are now applied. You can get a lot more information about all of the other settings at the PiJuice GitHub repo.
In the last step, we will set the Wakeup Alarm to specified times to fully
automate the camera trap recordings. The PiJuice wakeup alarm clock is set in
UTC time, so you have to convert the wake-up times to your time zone (in our
case UTC+2). As you can see in the example below, we set our Wakeup Alarm to
Every day at Hour 7;10;13;16 UTC time, which means that the PiJuice will
wake up the Raspberry Pi everyday at 9, 12, 15 and 18 o'clock (UTC+2). Activate
Wakeup enabled and press Set alarm to save your specified wake-up times.

During summer it might make sense to not record around noon, as many insects are not active during the hottest daytime. Also the temperature in the camera trap enclosure will be lower if the RPi and OAK-1 are not running, which can increase the charging efficiency of the batteries.
Install Software
Install the insect-detect
software including all required packages and setup steps:
Optional: Install and configure Rclone if you want to use the upload feature:
Your system is all set up and ready to go now! Please close and reopen your terminal
before using the uv command to ensure the PATH is updated and uv is available.
Before running scripts, first navigate to the insect-detect directory:
Run the web app with:
Check the Usage instructions for more details about the software and how to use it.
- More information about setting up the OAK camera and DepthAI can be found at the Luxonis Docs.
- If you want to learn more about the DepthAI software, check out the Software Documentation.
- For OAK-specific problems, get support in the
Luxonis Forum or post an issue
to the
depthai-corerepo.
Update Software
As the software for the Insect Detect camera trap is still under continuous development, it is recommended to update it regularly. The provided update script will create backups of all your config files, handle your local changes and give you instructions in the case of merge conflicts.
Update the insect-detect software by running: